
Is your HP touchpad not working? We know how frustrating it can sometimes be to work on a laptop without a touchpad. Although there are alternatives to keep you going, their absence can leave you in the lurch. But don’t fret as we bring to you this guide to resolve the issue in 10 easy steps and help you know exactly why your HP laptop touchpad is not working.
Here you go:
HP Touchpad Not Working: Key Reasons
- You have enabled an external mouse or other pointing devices.
- The trackpad of the BIOS motherboard is turned off.
- Corrupt or outdated IO driver.
- Touchpad zone is disabled.
- Issues in Windows hardware.
- Tablet PC Input Service is turned on.
- Touchpad driver is outdated.
- Old mouse drivers are interfering with the HP touchpad.
Once you are aware of the reasons behind the problem, you will be able to fix it effectively. Let’s check out how!
Fix 1:
Resolve Hardware Issues
The “HP Chromebook touchpad not working” issue can be resolved by fixing the utility issues in Windows hardware. Here are the correct steps you must follow:

- Start your Windows and open ‘Control Panel’ with the help of the keyboard.
- Choose the ‘Troubleshooting’ option.
- Select the ‘Hardware and Sound’ tab from the menu list.
- You will see the Control Panel is searching for troubleshooting problems. Once the search is over, choose the ‘Hardware and Device’ option under the ‘Hardware’ category.
- Then, navigate towards the ‘Next’ button with the help of the ‘Tab’ key and hit the ‘Enter’ key to select it.
Note: Check the ‘Apply repaired automatically’ option in the extreme left corner of the window.
- The troubleshooting process will start. You can track the speed on your screen.
- Hit the ‘Finish’ tab once the process is completed.
- To resolve the detected hardware issues, you must follow the on-screen steps.
- Once the hardware issues are resolved, close the ‘Control Panel’ window.
- Reboot the HP Windows and use your device with the touchpad.
Fix 2:
Disconnect External Mouse
If you have enabled the option to switch off the touchpad when an external mouse is connected then you may face HP laptop touchpad not working issues. In that case, either you must disable the option from your settings or disconnect the external mouse.
You can simply pull off the cable of the mouse or if you have a wireless mouse, go to the Bluetooth of the Windows and disconnect the mouse. Make sure you also turn off the Bluetooth button of your mouse.
Now, refresh your HP windows and you will see that the laptop’s touchpad is working smoothly.
Fix 3:
Enable Touchpad In Windows Settings
At times, the touchpad of your Windows switches off automatically resulting in the “HP Elitebook touchpad not working” error. Fortunately, in the Windows Settings application, there are specific settings for Touchpad. You can enable the touchpad with it to start working immediately.
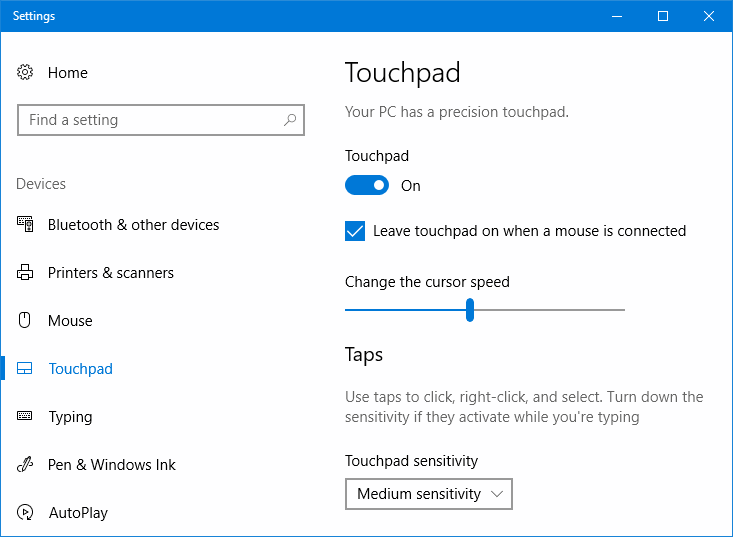
- Click on the ‘Windows’ key on your keyboard.
- Go to the ‘Search button’ and type ‘Touchpad’.
- Click on ‘Touchpad settings’ and open the window.
- There will be an option of ‘Touchpad’. Turn it on by clicking on the toggle.
- Now, navigate towards the ‘Cursor speed’ option and change the speed from ‘0’ to whatever you wish.
Fix 4:
Turn On The Disabled Trackpad In BIOS
Your HP laptop’s touchpad can be disabled from the BIOS motherboard itself. As a result, you cannot use your system with a touchpad. If this is the reason why your HP touchpad not working, then let’s learn how to enable the BIOS motherboard’s trackpad.
- Press the ‘Delete’ or ‘F2’ key repeatedly and enter the BIOS.
- Once the window opens, click on the ‘Advanced’ option.
- Here, you will see the different types of motherboards under the BIOS settings. Under ‘Speaker Volume’, there will be ‘Internal Pointing Device’, click on it.
- If the ‘Internal Pointing Device’ is disabled, click on the ‘Enabled’ option.
- Then. head to the upper-right corner of the screen and click on the ‘Enable Internal touch Pad’ option.
- Once the required changes are made, click on the ‘Save Changes and Exit’ option and close the window.
Fix 5:
Uninstall Other Mouse Drivers
If an HP Elitebook user has plugged in mice or other pointing devices in the past and forgotten to remove the drivers, users may face HP Elitebook 2170p touchpad not working issues later. If you are one of them, then let’s uninstall the drivers that are interfering with your touchpad.
- Start your Windows system and navigate towards the ‘Windows’ icon on the keyboard.
- Right-click on it and choose the ‘Device Manager’ option from the Windows menu list.
- Under the name of your HP laptop, click on the ‘Mice and other pointing devices’ option.
- All the available drivers will be shown under it. Now, right-click on the drivers one by one and choose ‘Uninstall’.
- If any warning message pops up on your screen, click on ‘Yes, uninstall the driver’.
- Once all of the drivers that were interfering are uninstalled, you will see that your HP touchpad is working again.
Fix 6:
Download Updated IO Driver
The serial IO driver in your HP Windows system helps the device to communicate with all the external devices such as touchpad, mouse and more. Issues in IO driver leads the laptop users to many technical issues. HP touchpad not working issues have also stemmed from the same. Follow the steps and replace the outdated IO driver with the latest one.
- At first, go to ‘HP driver packs page’ to match the correct version with your HP laptop model.
- Then, match the IO driver version with your Windows version.
- Go to the ‘Settings’ option and click on the ‘About’ tab.
- Under the same, you will see ‘Window specifications’.
- Make a note of your Windows version and go back to the IO drivers list.
- Choose the most-suitable one and hit the ‘Download’ button.
- When the IO driver is downloaded and installed properly, run it.
- Restart the HP laptop and confirm that the touch is now working.
Fix 7:
Rollback or Update Touchpad Driver
Many HP Envy X360 laptop users successfully have resolved the HP Envy X360 touchpad not working issues just by rolling back and updating the touchpad driver. Follow these steps and fix the issue in no time:
- Start Windows system and navigate towards the ‘Windows’ icon on the keyboard.
- Right-click on it and choose the ‘Device Manager’ option from the Windows menu list.
- Open the touchpad settings by clicking on the ‘HP Touchpad’ option from the list.
- In case it is disabled, enable it by clicking on the right toggle.
- Then, navigate towards the ‘Update driver’ tab and check if there are any updates available.
- After updating the driver, restart your HP laptop and check if the touchpad is working.
- If it doesn’t work, follow the same steps and click on the ‘Roll Back Driver’ tab.
- After rolling back the driver, your HP touchpad not working issue will surely be fixed.
Fix 8:
Enable the Touchpad Zone
The HP Pavilion touchpad not working issue can also be fixed by just enabling the touchpad zone.
You can enable the touchpad zone just by double-clicking on the circle logo on the touchpad. In case you cannot find it. Follow the manual steps:
- Go to the ‘Settings’ section of the Windows with the help of keyboard.
- Click on the ‘Devices’ options and then select the ‘Touchpad’ tab.
- There will be an option of ‘Additional Settings’, click on it.
- From the expanded options, click on ‘Touchpad Entry’ and then ‘Settings’.
- Now, in the ‘Touchpad Disable Zone Settings’, check the box next to ‘Double tap to enable or disable Touchpad’.
- Navigate towards the right end of the window and click on the ‘Apply’ button. Afterwards, you will see that the touchpad is working properly.
Fix 9:
Enable Touchpad in Mouse Properties
If you have not given the permission of enabling and disabling the touchpad to the Device Manage of your device then there is only a way to switch it back on is using the Windows mouse properties. Follow the steps to learn in detail and fix the mouse touchpad not working HP problems.
- Click on the ‘Windows’ icon on your keyboard and go to the ‘Search’ bar.
- Type ‘Mouse Settings’ and select the correct window to open from the best results.
- Choose the ‘Additional mouse options’ from the menu list.
- Navigate towards the ‘Device Settings’ on the taskbar and click on it.
- On the Devices table, you will see that the touchpad feature is not enabled.
- Click on the ‘Enable’ option and choose the ‘Static tray icon in taskbar’ option.
- In the lower-right corner, click on the ‘OK’ button then on ‘Apply’.
- Now, close the windows and restart your laptop to use the HP laptop touchpad without any issue.
Fix 10:
Turn Off Tablet PC Input Service
If you are an HP touchscreen laptop user and suddenly your HP touchpad is not working then there is a chance that the Tablet PC Input Service is creating a problem. The Tablet PC Input Service handles the stylus functionality of your system. Any kind of problem in a stylus can lead you to several problems. So, follow the steps mentioned below and disable the stylus before you face a big loss.
Note: For those who use stylus very actively, decide whether you want to enable and disable this service each time you use the touchpad or you want to disable it permanently to use touchpad with all convenience.
- Close all the currently opened windows of the HP laptop.
- Press the ‘Windows’ and ‘R’ keys and when the ‘Run’ box opens, type ‘services.msc’ and hit the ‘Enter’ key.
- Scroll down the list and click on the ‘Tablet PC Input Service’ or ‘TabletInputService’ as per your Windows version.
- Now, expand its options by clicking right on it and choose the option of ‘Disable’.
- Click on the ‘Apply’ option to save the changes and exit from that window.
After going through these quick fixes, we hope that you are not facing the HP laptop touchpad not working issues anymore. All of these fixes are tried and tested and very helpful for all versions of Windows. Remember, the steps may slightly vary depending on the Windows versions. In case, you have any doubt regarding 123.HP.Com/Setup on Windows 10 or how else you can solve it, then leave a comment. Our tech experts are available 24*7 to solve the query.
.